

با سلام خدمت دوستان عزیز در خدمتتون هستیم با آموزش کامل ساخت bottom navigation در آندروید بصورت تصویری
ما در این آموزش با ترکیب باتوم ناویگیشن و فرگمنت ها برنامه خودمونو پیاده سازی میکنیم پس با ما باشیید.
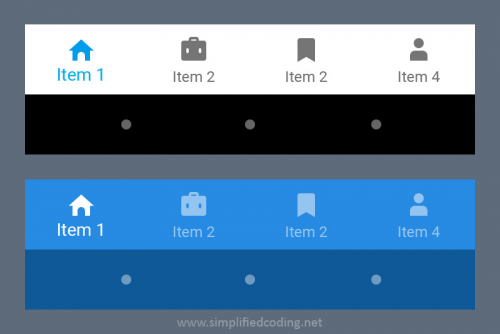
نمونه bottom ناویگیشن در زیر:
در قدیم استفاده از Bottom Navigation View فقط توسط کتاب
خانه های مختلف امکان پذیر بود اما گوگل پس از آپدیت
کتاب خانه Desgin خود Bottom Navigation View را به آن افزود.
خب همانطور که گفته شد باید از کتاب خانه Design گوگل استفاده شود
پس خط زیر را به Gradle خود افزوده و منتظر شوید تا Sync شود.
1-آسون ترین روشش اینه که شما با خود آندروید استودیو یک اکتیویتی بسازید
و نوع اکتیویتی رو Bottom Navigation Activity قرار بدید.
مثل تصویر زیر:
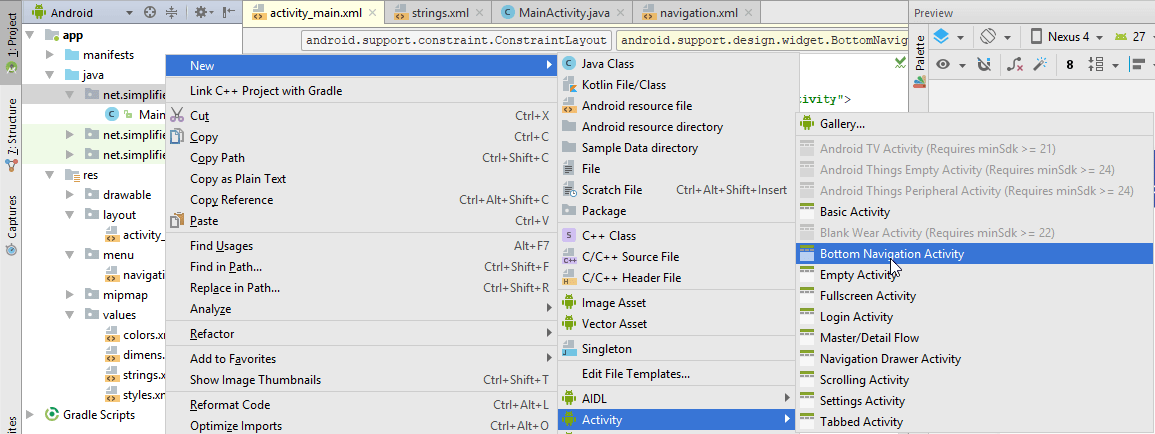
ساخت bottom navigation در آندروید
2-یا میتونید موقع ساخت پروژه اکتیویتی
پیشفرض رو روی Bottom Navigation Activity قرار بدید:
- من یک پروژه با نام BottomNavigationExample با استفاده ا
- ز Bottom Navigation Activity ایجاد کرده ام. شما می توانید
- اکتیویتی خالی را انتخاب کنید، هیچ تفاوتی نخواهد داشت.
- حالا اول، رنگها را تعریف میکنیم. شما می توانید رنگ را
- به هر چیزی که می خواهید تغییر دهید.
- بنابراین در colors.xml دوتا رنگ اضافه میکنید .
 <? xml  version = "1.0"   encoding = "utf-8" ?>
 < resources >
     < color  name = "colorPrimary" > #278be3</color>
     < color  name = "colorPrimaryDark" > #0f5998</color>
     < color  name = "colorAccent" > #4075a2</color>
     < color  name = "colorNavIcon" > #dae9f6</color>
     < color  name = "colorNavText" > #01294b</color>
 < / resources >
حالا به strings.xml رجوع کنید و رشته های زیر را تعریف کنید.
<resources>

    <string name="app_name">Bottom Navigation Android Example</string>

    <string name="title_home">Home</string>
    <string name="title_dashboard">Dashboard</string>
    <string name="title_notifications">Notifications</string>
    <string name="title_profile">Profile</string>

</resources>
- حالا به activity_main.xml بروید و آن را تغییر دهید همانطور که در زیر نشان داده شده است.
<?xml version="1.0" encoding="utf-8"?>
<android.support.constraint.ConstraintLayout xmlns:android="http://schemas.android.com/apk/res/android"
    xmlns:app="http://schemas.android.com/apk/res-auto"
    xmlns:tools="http://schemas.android.com/tools"
    android:id="@+id/container"
    android:layout_width="match_parent"
    android:layout_height="match_parent"
    tools:context="net.simplifiedcoding.bottomnavigationexample.MainActivity">

    <FrameLayout
        android:id="@+id/fragment_container"
        android:layout_width="match_parent"
        android:layout_height="match_parent"
        android:layout_marginBottom="56dp"
        android:text="@string/title_home"
        app:layout_constraintLeft_toLeftOf="parent"
        app:layout_constraintTop_toTopOf="parent" />

    <android.support.design.widget.BottomNavigationView
        android:id="@+id/navigation"
        android:layout_width="0dp"
        android:layout_height="wrap_content"
        android:background="@color/colorPrimary"
        app:itemIconTint="@color/colorNavIcon"
        app:itemTextColor="@color/colorNavText"
        app:layout_constraintBottom_toBottomOf="parent"
        app:layout_constraintLeft_toLeftOf="parent"
        app:layout_constraintRight_toRightOf="parent"
        app:menu="@menu/navigation" />

</android.support.constraint.ConstraintLayout>
به یاد داشته باشید برای <android.support.design.widget.BottomNavigationView />
ما می توانیم از خواص زیر استفاده کنیم
app:itemIconTint: برای تعریف رنگ نماد مورد نظر.app:itemTextColor: برای تعریف رنگ متن .android:background: برای تعریف زیر پس زمینه مرور ناوبری.app:menu: برای تعریف منو که ما باید در پایین نمای Navigation View نمایش داده شود.
در حال حاضر، اگر شما پروژه را با استفاده از bottom navigatio Activity ایجاد کردید،
یک فایل منو به نام navigation.xml به طور پیش فرض
در داخل پوشه منو ایجاد می شود. اگر ایجاد نشد، می توانید آن را به صورت دستی ایجاد کنید.
در اینجا ما تمام آیتم های منو را مشخص می کنیم که ما باید در نوار ناوبری پایین نمایش داده شود.
<?xml version="1.0" encoding="utf-8"?>
<menu xmlns:android="http://schemas.android.com/apk/res/android">

    <item
        android:id="@+id/navigation_home"
        android:icon="@drawable/ic_home_black_24dp"
        android:title="@string/title_home" />

    <item
        android:id="@+id/navigation_dashboard"
        android:icon="@drawable/ic_dashboard_black_24dp"
        android:title="@string/title_dashboard" />

    <item
        android:id="@+id/navigation_notifications"
        android:icon="@drawable/ic_notifications_black_24dp"
        android:title="@string/title_notifications" />

    <item
        android:id="@+id/navigation_profile"
        android:icon="@drawable/ic_profile_black_24dp"
        android:title="@string/title_profile" />

</menu>
خب حالا برای هر صفحه باید یه فرگمنت بسازیم:
فایلهای fragment_home.xml, fragment_dashboard.xml, fragment_notifications.xml و fragment_profile.xml.رابسازید
وکدهای پایین داخلشون قرار بدید یادتون نره که مقادیر تکست ویو رو تغییر بدید.
<?xml version="1.0" encoding="utf-8"?>
<RelativeLayout xmlns:android="http://schemas.android.com/apk/res/android"
    android:layout_width="match_parent"
    android:layout_height="match_parent">

    <TextView
        android:layout_width="wrap_content"
        android:layout_height="wrap_content"
        android:layout_centerHorizontal="true"
        android:layout_centerVertical="true"
        android:text="Home"
        android:textAppearance="@style/Base.TextAppearance.AppCompat.Large" />

</RelativeLayout>
حالا فایلهای جاوای فرگمنت ها رو با نام های HomeFragment.java, DashboardFragment.java, NotificationsFragment.java و ProfileFragment.java. بسازید
اینجام یادتون نره که لایوت هارو به کلاسمون معرفی کنیم.
وکدهای پایینو داخلشون قرار بدید.
package net.simplifiedcoding.bottomnavigationexample;

import android.os.Bundle;
import android.support.annotation.Nullable;
import android.support.v4.app.Fragment;
import android.view.LayoutInflater;
import android.view.View;
import android.view.ViewGroup;

/**
 * Created by Belal on 1/23/2018.
 */

public class HomeFragment extends Fragment {
    @Nullable
    @Override
    public View onCreateView(LayoutInflater inflater, @Nullable ViewGroup container, @Nullable Bundle savedInstanceState) {
        //just change the fragment_dashboard
        //with the fragment you want to inflate
        //like if the class is HomeFragment it should have R.layout.home_fragment
        //if it is DashboardFragment it should have R.layout.fragment_dashboard
        return inflater.inflate(R.layout.fragment_home, null);
    }
}
و در آخر کدهای MainActivity رو بصورت زیر قرار بدهید.
package net.simplifiedcoding.bottomnavigationexample;

import android.os.Bundle;
import android.support.annotation.NonNull;
import android.support.design.widget.BottomNavigationView;
import android.support.v4.app.Fragment;
import android.support.v7.app.AppCompatActivity;
import android.view.MenuItem;

//implement the interface OnNavigationItemSelectedListener in your activity class
public class MainActivity extends AppCompatActivity implements BottomNavigationView.OnNavigationItemSelectedListener {


    @Override
    protected void onCreate(Bundle savedInstanceState) {
        super.onCreate(savedInstanceState);
        setContentView(R.layout.activity_main);

        //loading the default fragment
        loadFragment(new HomeFragment());

        //getting bottom navigation view and attaching the listener
        BottomNavigationView navigation = findViewById(R.id.navigation);
        navigation.setOnNavigationItemSelectedListener(this);
    }


    @Override
    public boolean onNavigationItemSelected(@NonNull MenuItem item) {
        Fragment fragment = null;

        switch (item.getItemId()) {
            case R.id.navigation_home:
                fragment = new HomeFragment();
                break;

            case R.id.navigation_dashboard:
                fragment = new DashboardFragment();
                break;

            case R.id.navigation_notifications:
                fragment = new NotificationsFragment();
                break;

            case R.id.navigation_profile:
                fragment = new ProfileFragment();
                break;
        }

        return loadFragment(fragment);
    }

    private boolean loadFragment(Fragment fragment) {
        //switching fragment
        if (fragment != null) {
            getSupportFragmentManager()
                    .beginTransaction()
                    .replace(R.id.fragment_container, fragment)
                    .commit();
            return true;
        }
        return false;
    }
}
حالا اپلیکشنتون رو یه بار اجرا کنید باید مثل زیر باشه
کار با bottom navigation و فرگمنت ها
خب تموم شد امیدوارم این مطلب براتون مفید باشه.
همچنین ببینید:
سورس صدای زنگ آندروید متریال دیزاین بهمراه پنل مدیریت تحت وب
معرفی سایت کریپتوتب و نحوه کار با افزونه یا مرورگر کریپتوتب برای دریافت بیت کوین رایگان
آموزش دابل بک یا دوبار زدن دکمه عقب برای خروج در برنامه نویسی آندروید-هیروتک
سورس تلگرام ضد فیلتر پروکسی دار مانند سورس تلگرام طلایی با پنل مدیریت


 25153 کاربر
  106 محصول
  86 مطلب
  436 دیدگاه


